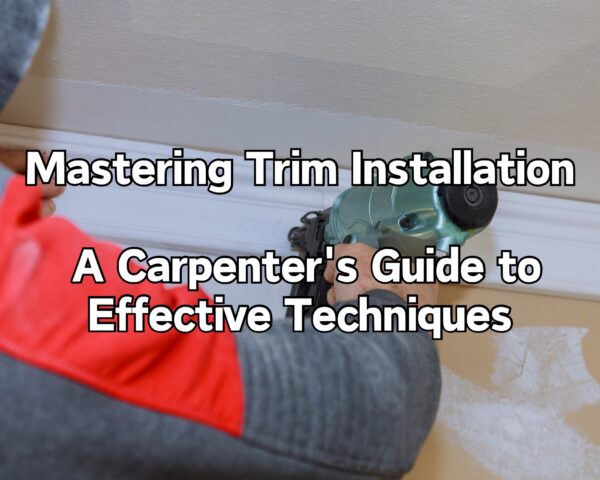
As a seasoned carpenter, I’ve learned that installing trim requires both precision and patience, especially when it comes to ensuring the glue sets properly. While a brad nailer is a common tool for this task, there are situations where it might not be the best choice. Let’s explore some effective methods for holding trim in place while the glue dries, drawing from my firsthand experiences in the field.
The Challenge with Brad Nailers
Brad nailers, like the DEWALT 20V MAX* Cordless Brad Nailer Kit, are incredibly efficient and provide a strong hold. However, they can be less ideal for thinner trim, as they might cause splitting or leave visible nail heads. Additionally, the need for an air compressor with nailers that need air, can be a limitation if you’re working in a space where it’s not feasible to have one. The one linked above from Amazon is a dewalt battery operated one that doesn’t need an air compressor!
Using Super Glue for Quick Adhesion
One trick I often use is applying a bit of super glue along with the standard nail glue, like Liquid Nails. Super glue dries quickly and holds the lightweight trim in place, allowing the stronger adhesive more time to cure. This method is particularly useful in delicate areas where a nailer might cause damage.
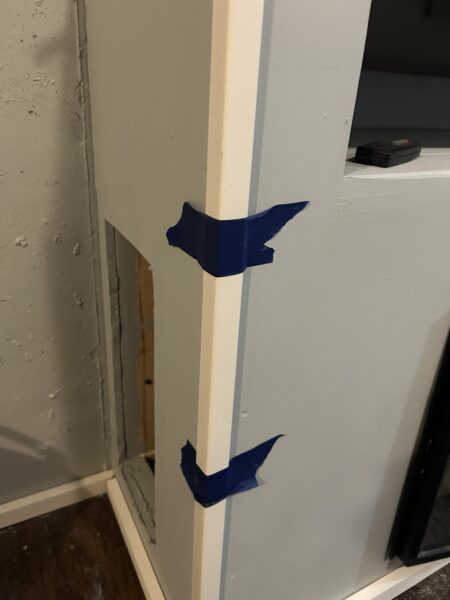
Painter’s Tape: A Simple Yet Effective Solution
Painter’s tape is another go-to method for securing trim. It’s gentle on surfaces and can be easily removed without leaving residue. After applying the adhesive, I place the trim and secure it with strips of painter’s tape along its length. This method is especially useful for longer pieces of trim that need even support while the glue sets.
The Ideal Combination: Liquid Nails and a Brad Nailer
If circumstances allow, the combination of Liquid Nails and a brad nailer, like the DEWALT 20V MAX* Cordless Brad Nailer, is a highly effective approach. The adhesive provides a strong, lasting bond, while the brad nailer offers immediate hold and stability. This method is fast, efficient, and provides a clean finish, especially with a battery-powered nailer that eliminates the need for an air compressor.
In trim installation, understanding the strengths and limitations of various methods is key. Whether opting for the quick setting of super glue, the gentle hold of painter’s tape, or the robust combination of Liquid Nails and a brad nailer, each technique has its place in a carpenter’s toolkit. For those interested in a reliable brad nailer, the DEWALT 20V MAX* Cordless Brad Nailer Kit is an excellent investment, offering versatility and ease of use for a wide range of projects.
Utilizing Painter’s Tape for Trim Installation: A Step-by-Step Guide
As a carpenter, I’ve often relied on painter’s tape as a simple yet effective method for holding trim in place while glue dries. This technique is particularly useful when working with delicate trim or in situations where using a nailer isn’t ideal. Here’s a detailed guide on how to use painter’s tape for this purpose:
Step 1: Prepare the Surface
Before starting, ensure that the surface where the trim will be installed is clean and dry. Any dust, dirt, or moisture can affect the adhesion of the glue. If you’re working on a painted surface, make sure the paint is fully cured.
Step 2: Apply the Adhesive
Choose a suitable adhesive for your trim material. For most wood trims, a quality wood glue or a construction adhesive like Liquid Nails works well. Apply the adhesive to the back of the trim in a consistent bead. Be careful not to apply too much, as it can squeeze out and create a mess when you press the trim against the surface.
Step 3: Position the Trim
Carefully place the trim onto the desired location. Gently press it against the surface to ensure good contact with the adhesive. Make any necessary adjustments quickly before the glue starts to set.
Step 4: Apply Painter’s Tape
Take your painter’s tape and tear off lengths that are manageable to work with. Start applying the tape at one end of the trim, stretching it across to the other side to hold the trim firmly against the wall or surface. The tape should be taut but not so tight that it warps or bends the trim.
Place strips of tape along the length of the trim at regular intervals. For longer pieces of trim, you might need to use more tape to ensure even support. The goal is to keep the trim securely in place while the glue dries, without leaving any gaps or loose areas.
Step 5: Let the Glue Dry
Refer to the adhesive’s instructions for drying times. It’s important to leave the tape in place until the glue has fully cured. Removing the tape too early can cause the trim to shift or come loose.
Step 6: Remove the Tape
Once the glue is dry, carefully remove the painter’s tape. Do this slowly to avoid pulling off any paint or damaging the trim. If there’s any adhesive residue on the trim or wall, gently clean it off.


Mastering the Super Glue Method for Trim Installation
In addition to painter’s tape, using super glue in conjunction with a more permanent adhesive like Liquid Nails can be an effective method for installing trim, especially for delicate or intricate work. Here’s how I approach this technique:
Step 1: Prepare Your Materials
Ensure that both the trim and the surface it will be attached to are clean and dry. Have your super glue, permanent adhesive (like Liquid Nails), and any necessary tools at hand. It’s important to work quickly once you start applying the super glue, so organization is key.
Step 2: Apply the Permanent Adhesive
Run a bead of the permanent adhesive along the back of the trim. Be mindful of the amount – too much can cause it to seep out the sides when pressed against the wall, while too little might not provide a strong enough hold.
Step 3: Add Dots of Super Glue
Along with the permanent adhesive, add a few small dots of super glue at strategic points along the trim. The super glue acts as a quick-setting agent, holding the trim in place while the more durable adhesive dries. Be careful not to use too much super glue, as it can be difficult to remove if it seeps out.
Step 4: Position and Press the Trim
Carefully align the trim to the desired position on the wall or surface and press it firmly in place. The super glue will set quickly, so ensure your alignment is precise. Hold the trim firmly against the surface for a few moments to allow the super glue to take hold.
Step 5: Secure with Painter’s Tape if Needed
If the trim is long or heavy, you might still want to use painter’s tape to provide additional support while the permanent adhesive dries. This is especially useful if the trim is in a high-traffic area or if it’s being installed in a position where it might be subject to movement or pressure.
Step 6: Allow Adequate Drying Time
Refer to the drying times specified for your permanent adhesive and allow the trim to set undisturbed for this duration. The super glue will hold the trim in place initially, but the long-term strength and stability come from the permanent adhesive.
Step 7: Clean Up and Finish
Once the adhesive is fully dried, remove any painter’s tape if used. Check the edges for any excess adhesive or super glue that may have seeped out and clean it up carefully.
The super glue method is a handy trick for quickly securing trim in place, allowing for a more efficient workflow, especially in intricate or delicate installations. For larger projects or where a more robust solution is needed, tools like the DEWALT 20V MAX* Cordless Brad Nailer Kit can provide a more permanent solution. Each method has its place in a carpenter’s toolkit, and understanding when and how to use them can greatly enhance the quality and efficiency of your work.


The Advantages of the DEWALT Battery Nailer for Quick and Efficient Trim Installation
In my experience as a carpenter, when it comes to combining speed, ease of use, and strength in trim installation, the DEWALT 20V MAX* Cordless Brad Nailer Kit stands out as a top choice. Here’s why I consider it the best option for most trim work:
Speed and Efficiency
The DEWALT Brad Nailer is a powerhouse when it comes to quick installation. Unlike manual nailing or waiting for adhesives to dry, this nailer drives nails instantly and consistently. This speed is a game-changer, especially for larger projects or when working under time constraints.
Cordless Convenience
Being battery-powered, the DEWALT 20V MAX* Cordless Brad Nailer offers unparalleled convenience. There’s no need for an air compressor or hoses, which not only saves setup and cleanup time but also increases mobility. You’re free to move around the project site without being tethered to a power source.
Precision and Strength
This nailer provides precision and strength, ensuring that trim is securely attached with minimal effort. The risk of splitting or damaging the trim is significantly reduced compared to heavier nail guns or even manual hammering. Plus, the nails are small and can be easily filled and painted over for a clean, professional finish.
Adjustable Settings
The DEWALT Nailer comes with adjustable settings to control nail depth, which is crucial for achieving the perfect finish, especially in trim work where aesthetics are as important as functionality. This flexibility allows for customization according to the material and the specific requirements of the project.
Durability and Reliability
DEWALT is known for its durable and reliable tools, and this nailer is no exception. It’s built to withstand the rigors of heavy use, making it a valuable long-term investment for both professional carpenters and DIY enthusiasts.
Common Questions and Answers About Installing Trim
What is the most cost-effective method for installing trim? The most cost-effective method can vary based on the tools you already have and the scope of your project. For small or one-off projects, using adhesives with methods like the painter’s tape or super glue can be more economical. For larger projects or frequent trim work, investing in a tool like the DEWALT 20V MAX* Cordless Brad Nailer can be cost-effective in the long run due to its efficiency and time-saving capabilities.
Is it necessary to use a finish nailer for installing trim? While a finish nailer, like the DEWALT Brad Nailer, provides a quick and strong hold, it’s not always necessary. For delicate trim or in situations where a nailer might cause damage, adhesive methods can be sufficient. The choice depends on the type of trim, the surface it’s being attached to, and personal preference.
Can I use just super glue for installing trim? Super glue can be used for temporarily holding trim in place, but it’s not recommended as the sole adhesive. For a durable and lasting hold, it’s better to use a construction adhesive like Liquid Nails along with super glue or another method to secure the trim while the primary adhesive dries.
How do I ensure the trim is aligned properly when using adhesive methods? Careful measurement and marking are key. Before applying the adhesive, measure and mark where the trim will go. You can use a level to ensure it’s straight. When using painter’s tape, apply the tape evenly and check the alignment as you go.
What safety precautions should I take when using a brad nailer? Safety is crucial when using any power tool. Always wear safety glasses to protect your eyes from flying debris. Read and follow the manufacturer’s instructions and safety guidelines. Be aware of your surroundings, especially if you’re working in a space shared with others.
How do I choose the right adhesive for trim work? The choice of adhesive depends on the material of the trim and the surface it’s being attached to. For most wood trims, a wood glue or a construction adhesive like Liquid Nails is suitable. Ensure the adhesive is compatible with both materials for a strong bond.
What’s the best way to fill nail holes in trim? After installing trim with a nailer, you can fill the nail holes with wood filler or spackle. Choose a filler that matches the color of the trim or can be painted over. Apply the filler, let it dry, then sand it smooth for a seamless finish.
Further Reading on DIY Home Improvement at DIY Home Wizard
For those passionate about DIY home improvement and looking to expand their knowledge and skills, DIY Home Wizard offers a variety of informative articles. Here are some that you might find particularly useful:
- The Challenges of Using Lacquer in Home Projects: This article delves into the complexities of using lacquer in home improvement projects, discussing both its benefits and drawbacks, and offering practical advice for those considering its use.
- Conquer Stubborn Stains: Discover the Best Stain Remover for Impeccable Fabrics: If you’re dealing with tough stains, this comprehensive guide provides insights into choosing and using the most effective stain removers for various types of fabrics.
- Crafting Unique Indoor Plant Pot Holders: A DIY Guide: For those who enjoy adding a touch of greenery to their homes, this DIY guide offers creative ideas and step-by-step instructions for crafting unique plant pot holders.
These articles provide valuable tips and insights for a range of home improvement projects. Whether you’re looking to tackle a specific challenge or seeking inspiration for your next DIY endeavor, DIY Home Wizard has the resources you need. Explore these articles and more at DIY Home Wizard for a wealth of information on enhancing your home with your own hands.
As an Amazon Associate we earn from qualifying purchases through some links in our articles.