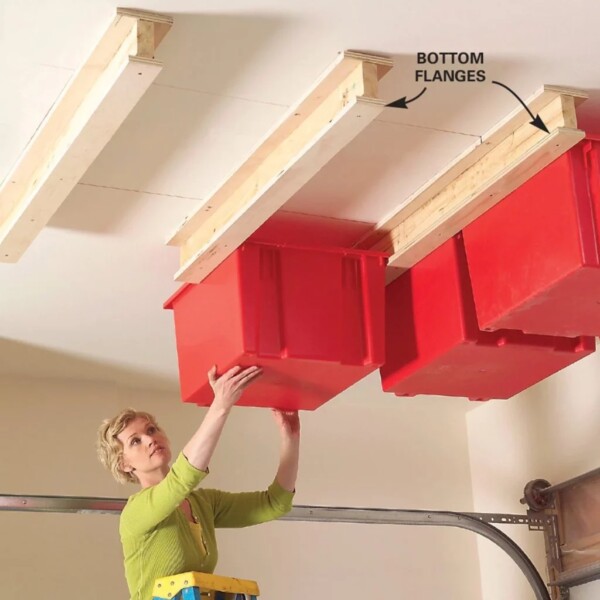
Is your garage or storage area feeling overwhelmed by clutter? Tired of tripping over items on the floor? It’s time to reclaim your space with a clever DIY solution: wooden flanges for overhead tote storage. This step-by-step guide will walk you through the process of creating and installing these space-saving organizers, allowing you to store your totes neatly overhead.

What You’ll Need:
- Materials:
- Sturdy wooden boards (2×4 or 2×6)
- Strong ceiling anchors
- Heavy-duty hooks or hangers
- Screws
- Tools:
- Measuring tape
- Level
- Cordless drill with appropriate bits
- Saw (circular or miter)
- Screwdriver or cordless drill
Crafting Your Wooden Flanges:
- Measure and Cut: Begin by measuring the length of your totes. Based on this measurement, cut your wooden boards to create the flanges. Each flange will act as a support for the totes.
- Determine Placement: Decide where you want to install the flanges on the ceiling. Ensure that the spacing accommodates the width of your totes.
- Marking and Anchoring: Use a stud finder to locate ceiling joists. Mark the positions for the wooden flanges and drill pilot holes for the ceiling anchors.
- Attach the Anchors: Insert the ceiling anchors into the pilot holes. These anchors provide strong support for the flanges.
- Position and Secure Flanges: Hold the wooden flanges in place over the anchors and secure them using screws. Make sure they are level and stable.
- Test for Strength: Gently tug on the flanges to ensure they are securely attached to the ceiling. They should be able to hold the weight of the totes.
Effortless Tote Storage:
- Slide-In Storage: Once the wooden flanges are in place, simply slide your totes onto the flanges. The totes will hang securely, creating additional storage space on your ceiling.
- Space Optimization: By utilizing vertical space, you’ll free up valuable floor area and create a more organized environment.
- Easy Access: Retrieving items from the totes becomes a breeze, as you can easily access them without having to bend down or search through stacks.
- Customizable: Depending on the width and depth of your totes, you can adjust the spacing between the flanges to suit your storage needs.
Maximize Your Storage Potential:
- Efficient Organization: Store seasonal items, holiday decorations, or rarely used items in your overhead totes, keeping them accessible yet out of the way.
- Safe and Secure: By using sturdy wooden flanges and secure anchors, you can trust that your totes will remain safely suspended.
- Quick and Cost-Effective: This DIY solution requires minimal materials and tools, making it a budget-friendly way to enhance your storage space.
- Tailored to Your Space: Adjust the number and positioning of the flanges to match your available ceiling space and the size of your totes.
Transform your garage or storage area into a clutter-free haven by implementing DIY wooden flanges for overhead tote storage. This creative solution not only maximizes your available space but also keeps your belongings organized and easily accessible. By following this guide, you can create a customizable storage system that suits your needs, all while enjoying the benefits of a tidy and efficient space.
As an Amazon Associate we earn from qualifying purchases through some links in our articles.


