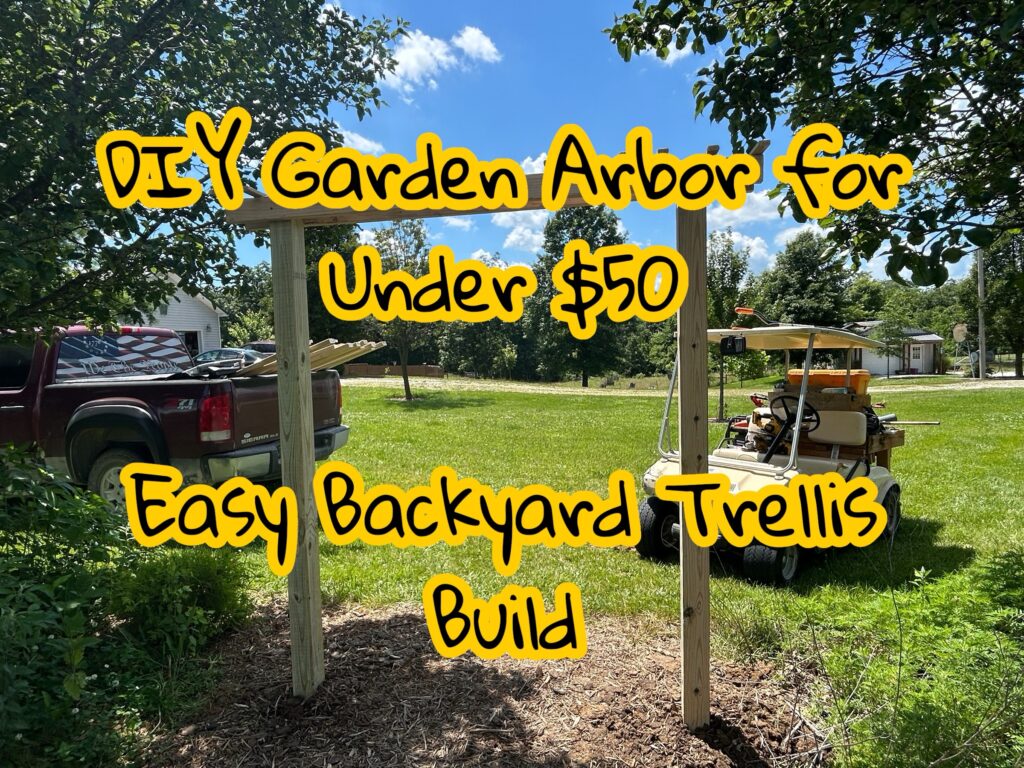
Why I Built a Garden Arbor Along Our Privacy Hedge Path
We’ve got a cozy, mulched path winding between our privacy hedge and living fence wall—and I wanted a little entrance that felt welcoming, not just functional. So I decided to build a garden arbor, right at the start of that leafy walkway.
I wasn’t going for grandeur, just something charming and inexpensive that would invite you in and frame the space. I imagined it draped with wisteria or climbing vines—an arch of green you walk through every day. It felt alive and intentional, a small detail that completely changed how our hedge wall felt.
If you’ve added garden features like a fence or gate before, you’ll know that final touch—like a garden arbor—makes everything feel more curated and homey. 👉 I also built a wooden garden gate along another part of our yard; feel free to check it out: Transform Your Garden with These Wooden Gate Designs


Materials I Used for This Cheap Garden Arbor Build
Here’s the thing I love about this arbor project—it only took a few simple parts and cost me under $50 total. No fancy tools, no expensive lumber. Just good old basic materials that any homeowner can grab easily.
What I Used:
- Two 4x4x8 treated posts – These go deep in the ground to hold the structure steady.
- Two 2x4x8 boards – Cut down to fit between the posts, with about 6¾˝ of overhang on each side.
- Three 1×2 boards – Cut shorter and attached perpendicular to the 2x4s to add charm and structure to the top.
- Deck screws – To keep everything locked tight.
- Post-hole digger or auger – For digging holes deep enough to withstand wind or soil movement.
- Optional concrete mix – I didn’t use it, but if your soil is loose or wet, it’s a smart add-on.
This setup is sturdy enough for everyday use, and even gives climbing vines like wisteria something to grab onto and artfully grow over. It’s all about simple pieces assembled smartly.
How I Built the Arbor: Simple Steps Anyone Can Follow
Once I had the posts and boards ready, it was just a matter of assembly. I started by digging two holes for the 4×4 posts at the entrance of the mulched path. I spaced them about 3 feet apart, but your spacing will depend on the feel you want and the width of your walkway.
I set the posts in the ground about 2 feet deep using a post-hole digger. I didn’t use concrete because our soil holds tight, but if yours is sandy or you want extra strength, it’s a smart move to anchor them in.
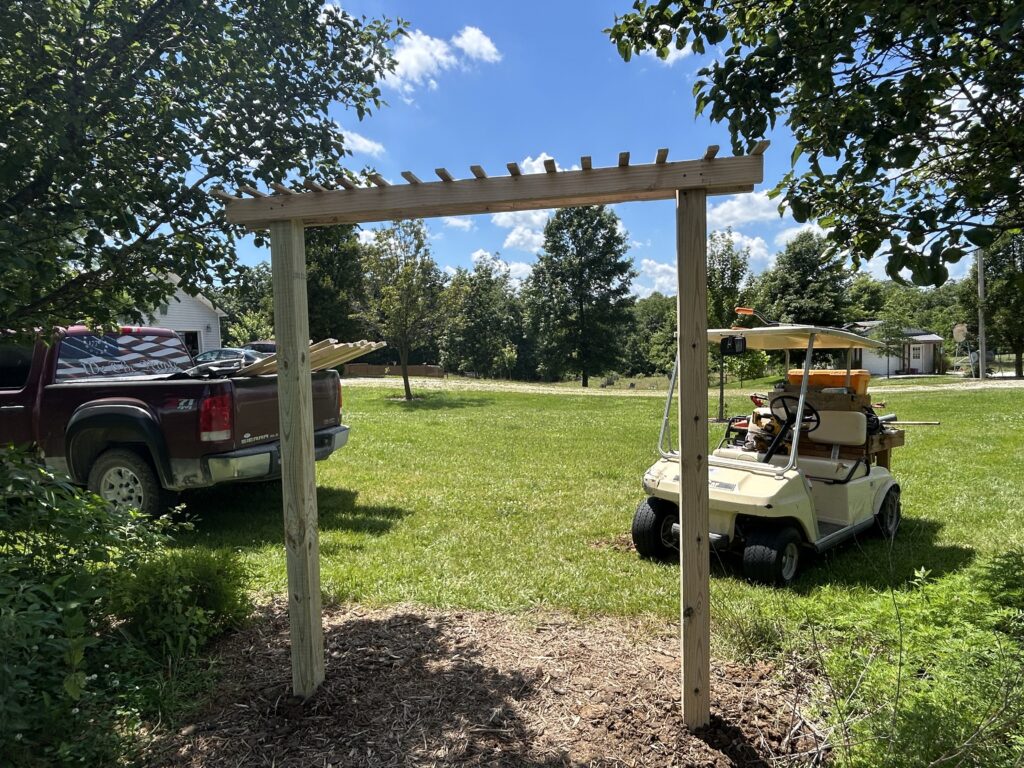
Next, I measured and cut the two 2x4s to run horizontally across the top. I let them overhang the posts by about 6¾ inches on each side—it just looked more finished that way. I attached one 2×4 on each side of the posts, kind of sandwiching the tops of the 4x4s.
Then came the fun part: I cut small 1×2 pieces and attached them across the top 2x4s like little roof slats. They run the opposite direction and overhang a bit too. This gave the arbor a soft, shaded look—almost like a mini pergola.
It’s the kind of project that feels fancy when it’s done but is actually super doable. Just like when I built this little trellis combo—if you’re adding plants, you might like this read:
👉 Build a Campfire — it has a similar rustic, welcoming feel that pairs great with outdoor spaces.
Why I Chose Wisteria (and What Else Would Work Great)
Once the structure was up, I wanted something that would climb fast, flower beautifully, and create that secret-garden kind of feel. Wisteria was an easy choice. It’s bold, dramatic, and once established, it grows like wildfire. In fact, you have to keep it trimmed or it’ll take over everything.
Wisteria vines love a strong structure to climb—like this arbor—and they absolutely thrive with full sun. I planted one on each side and used some simple garden ties at first to train the vines up the posts.
Not a wisteria fan? There are plenty of other climbing plants that would look amazing here:
- Clematis – Smaller and comes in tons of colors.
- Honeysuckle – Sweet-smelling and hardy.
- Trumpet vine – Attracts hummingbirds.
- Morning glory – A quick grower with bright, bold blooms.
I also added a DIY hose hanger nearby so I could easily water everything. If that’s something you need too, you’ll love this: 👉 DIY Guide: How to Build a Garage Bike Hanger with Wall Hooks. It’s another one of those cheap fixes that makes life easier outside.

How I Weatherproofed the Arbor (So It Wouldn’t Rot in a Year)
After putting the arbor together, I didn’t just leave it exposed—especially with Missouri weather flipping between damp and blazing. I made sure to seal all the wood with an exterior-rated wood sealer. I used a clear one because I wanted the natural wood grain to show through, but a stained sealer would work just as well if you want more color.
I also applied an extra coat to the bottom two feet of the 4×4 posts—the part that sits in the ground or touches mulch. That area takes the most moisture abuse and tends to rot first if left untreated. If you want to go the extra mile, you could even wrap the buried part with a bit of roofing membrane or use post saver sleeves.
You don’t need anything fancy—just a decent brush and a little patience. And trust me, if you skip this step, you’ll be rebuilding your arbor in a couple years. Been there.
If you’re like me and want to cut future headaches, you might also enjoy this post:
👉 How to Repair Water-Damaged Drywall and Prevent Future Issues — because protecting your investments applies indoors and out.

A Few Months Later: How It’s Holding Up
Now that the arbor has been in place for a few months, I can honestly say it was one of the best weekend projects I’ve done. The wood still looks sharp, the structure is solid, and the wisteria is starting to curl its way up the posts just like I hoped.
The little pathway now feels like an actual garden feature—not just a space between hedges. It frames the view perfectly, gives a sense of purpose to that area, and has become a conversation piece when people come over. I’ve even thought about adding solar string lights across the top slats to give it a soft glow at night.
It’s also been a great place to snap photos of the garden. The way the light filters through the slats and vines creates such a pretty backdrop.
If you’re working on outdoor aesthetics like this, you might also like this post on unique fencing ideas:
👉 Flat Head Screws… Whyyyyyyy? — it’s not just funny, it’s full of those little lessons that only come from doing it yourself.

Why Every Backyard Needs a Garden Arbor
Looking back, I wish I had added a garden arbor like this years ago. It’s such a simple structure, but it completely changes the vibe of a backyard or walkway. Instead of just being a space between things, the arbor creates a destination—a focal point that makes your garden feel more intentional and peaceful.
And honestly? You don’t need to spend hundreds to get that “Pinterest garden” look. I pulled this off for under $50 using basic lumber and a little effort. If you’ve got a spare afternoon, this is absolutely doable—even if you’ve never built anything before.
Whether you want to train vines, frame a view, or just add character to your yard, a garden arbor might be your next favorite project. It definitely became one of mine.
And if you’re in the mood to keep that DIY momentum going, you might enjoy:
👉 Crafting Unique Indoor Plant Pot Holders — another fun way to bring life and personality to your space, especially if you’re plant-obsessed like me.

What Are the Best Plants to Grow on a Garden Arbor?
If you’re building a garden arbor, you probably want to grow something up and around it—and I totally get that. The vines and blooms are what bring this thing to life.
Here are a few plant options that work beautifully on a garden arbor:
- Wisteria – This is what I’m personally growing on mine. It starts slow, but once it takes off, the blooms are showstoppers.
- Clematis – Fast-growing and full of color, clematis gives you tons of options and can bloom multiple times a season.
- Climbing roses – More work, but worth it. They add serious elegance and romantic vibes to your arbor.
- Honeysuckle – This one’s great for scent and attracting pollinators like hummingbirds.
- Trumpet vine – A little wild but gives you a tropical jungle vibe if that’s your thing.
Make sure you’re pairing the right plant with your climate and sun exposure. And don’t forget to seal your wood! I used a clear outdoor sealant to protect the arbor frame from rot and mold—something simple like this weather-resistant wood sealer does the trick and lasts for years.
How to Customize Your Garden Arbor to Match Your Style
Here’s where you can really make this project your own. Your garden arbor doesn’t have to look like anyone else’s—you can tweak the design to fit your vibe.
Some easy ideas:
- Add lattice panels on the sides for more climbing support and a fuller look.
- Paint or stain the wood to match your home or garden color scheme.
- Attach solar lights or string lights to the top for a soft evening glow.
- Incorporate planters at the base of each post for a built-in flower bed.
- Use it as an entryway arch for a veggie garden or flower patch.
I made mine super simple on purpose—just clean lines and unfinished wood for a natural look—but the beauty of DIY is that you can take this in any direction you want. If you’re into rustic charm, modern clean-cut, or even a more romantic garden gate look, this project is 100% customizable.
Looking for more ways to upgrade your yard? Check out this post on transforming your garden with wooden gate designs for some really creative ideas to go along with your new arbor.
As an Amazon Associate we earn from qualifying purchases through some links in our articles.