Squeaky floors are caused by wood rubbing against wood or against a nail — usually because the subfloor has separated slightly from the joist beneath it, or because hardwood flooring boards have dried and shifted. The fix depends on whether you have access from below. With basement or crawl space access the repair is easy and permanent. From above it takes a little more finesse but it’s still a solid DIY fix. This article covers every scenario.
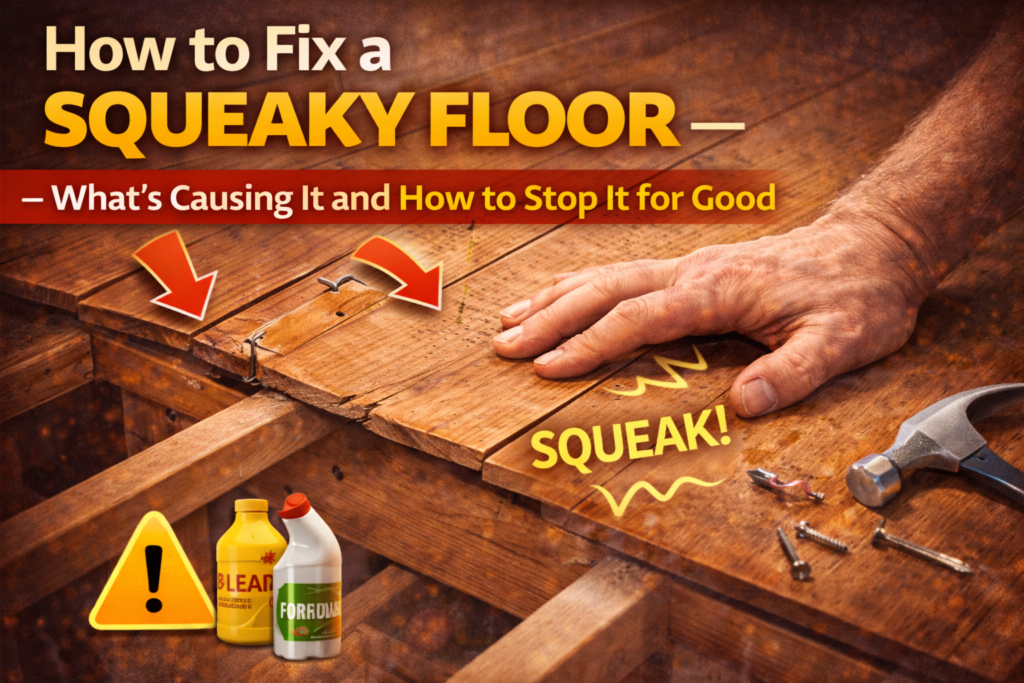
There’s always one spot. You know exactly where it is because you’ve memorized how to avoid it — that one step on the way to the bathroom at 2am that sounds like a foghorn. Or the entire hallway that announces every single person who walks down it. Or the bedroom floor that squeaks loud enough to wake a sleeping baby three rooms away.
Squeaky floors are one of the most complained-about home problems and one of the most fixable. The squeak itself tells you almost everything you need to know about what’s causing it — wood moving against wood or against a fastener, usually because a connection that was tight when the house was built has loosened over time as the wood dried, settled, and shifted.
Here’s how to diagnose exactly what’s happening under your feet and fix it permanently.
Why Floors Squeak — The Actual Cause
Wood moves. This is the fundamental fact that underlies almost every squeaky floor. Lumber used in home construction contains moisture when it’s installed — sometimes quite a lot of it — and as it dries over the first few years after construction it shrinks slightly. Seasonal humidity changes cause ongoing expansion and contraction throughout the life of the home. This movement is normal and unavoidable.
The squeak happens when this movement causes two surfaces to rub against each other. The most common scenarios are these:
The subfloor — the structural panel layer nailed to the joists — has pulled away slightly from the joist below it. When you step on it, it flexes down and then springs back up, and the nail holding it to the joist rubs against the wood as it moves, producing the squeak. This is by far the most common cause and it’s what creates that characteristic creak that happens when you step on one specific spot.
Hardwood floorboards have dried and the tongue-and-groove joints between adjacent boards have loosened. When you walk across them the boards rub against each other at the joint, producing a squeaking or rubbing sound. This is more common in older homes with solid hardwood and tends to be more of a general area squeak rather than a single-spot squeak.
The subfloor itself has a gap or void between it and the joist — not a fastener movement issue but a gap where the joist has bowed or the subfloor wasn’t pulled tight during installation. Each step causes the subfloor to flex slightly into the gap and spring back.
Understanding which scenario you’re dealing with determines which fix you need. The good news is that the diagnosis is usually straightforward — it’s mostly about whether you have access from below and what the floor responds to when you test it.

Diagnosing Your Squeak
Pinpoint the Exact Location
Walk slowly across the squeaky area and find the exact board or spot that squeaks. Mark it with a piece of tape. The more precisely you locate it the more targeted your repair can be. A squeak that happens over a few inches of floor is almost always a single fastener or a gap between the subfloor and one joist. A squeak that happens over a wider area suggests multiple loose boards or a broader subfloor issue.
Test What Makes It Squeak and What Stops It
Step on the squeaky spot and have someone press down firmly on the floor a few inches in each direction from the squeak while you step on it. If pressing down in one direction stops the squeak, you’ve found which way the floor is moving and where it needs to be secured. This tells you exactly where to put the screw or nail.
Also try this: press down on the floor with your foot and hold it down — does the squeak happen when you push down, when you lift your foot back up, or both? A squeak only on the way down suggests the subfloor is flexing away from the joist. A squeak on the way back up suggests it’s being pulled back and the fastener is dragging through the wood. Both directions suggests significant movement.
Check From Below If Possible
If you have a basement or crawl space, go below while someone walks on the squeaky area above. You’ll be able to see or feel the subfloor moving. Look for the gap between the subfloor and the joist — even a gap of a millimeter or two is enough to produce a squeak. You may also see the nails moving as the floor flexes — visible movement at a nail is a clear diagnosis of a nail-based squeak.


Fixing Squeaky Floors From Below — The Best Method
If you have access from below — basement, crawl space, or unfinished lower level — this is the easiest and most permanent fix for most squeaky floors. You’re working on the structural side of the squeak rather than trying to fix it through finished flooring above.
For a Gap Between Subfloor and Joist
A small gap between the subfloor and the top of the joist is best fixed with a thin wood shim coated in construction adhesive. Have someone stand on the squeaky spot above while you work below — the weight keeps the subfloor down and shows you exactly where the gap is.
Apply a thin coat of construction adhesive to both faces of a wood shim, then tap it gently into the gap between the subfloor and the joist. Don’t drive it in hard — you want to fill the gap, not widen it by forcing the subfloor up. A shim that goes in with light tapping and just snug contact is correct. The adhesive bonds the shim to both surfaces and eliminates the movement that causes the squeak.
Let the adhesive cure overnight before testing. This fix is permanent and invisible — nothing has been done to the finished floor above.
For a Subfloor Flexing on a Joist
When the subfloor is moving against the joist rather than gapping from it, driving a screw through the subfloor into the joist pulls them tight together and stops the movement. From below, drive a coarse-thread wood screw — 1-1/4 inch is usually right — up through the subfloor into the joist. Don’t go too long or the screw will come through the finished floor above. Measure the combined thickness of the subfloor and any underlayment and choose a screw that goes solidly into the joist without breaking through the surface above.
For driving screws into tight spaces below: The DEWALT 20V MAX Cordless Drill and Impact Driver Combo Kit gives you both a drill for pilot holes and an impact driver for driving screws into dense subfloor material — the combination makes this kind of structural repair work much faster and more controlled than a single tool.
For a Longer Gap Along a Joist
If the gap runs along the length of a joist rather than being a single small spot, a wood glue and clamp approach works well. Apply construction adhesive along the top edge of the joist where it contacts the subfloor, then drive screws up through the subfloor into the joist at 8-inch intervals to pull the surfaces together while the adhesive cures. Remove the screws after 24 hours — the adhesive bond is what holds, and the screws just provided clamping pressure during curing. This gives a completely silent, permanent fix.
Fixing Squeaky Floors From Above — When You Have No Access Below
Most homeowners don’t have the luxury of crawling under the floor to fix squeaks from below. The good news is that above-floor fixes work well too — they just require a little more precision to avoid visible damage to the finished floor surface.
Finding the Joist From Above
Before you can drive any fastener from above, you need to know where the joist is. Joists run perpendicular to the floorboards in most homes and are spaced either 16 inches or 24 inches apart on center. A stud finder set to its deepest detection mode can locate joists through subfloor and finished flooring. Look for the nail line along the floor — the row of nail holes or filled nail dimples that runs in a straight line across the boards usually marks where the subfloor was nailed to the joist below.
For locating joists accurately: The Franklin Sensors ProSensor M210 Stud Finder uses 13 sensors simultaneously and shows you the full width of a joist rather than just one edge — so you know exactly where center is before drilling. Far more reliable than single-sensor stud finders for this kind of precise work.
The Screw Method for Hardwood Floors
For hardwood floors, the cleanest above-floor fix uses finish screws driven at an angle through the face of the board and into the subfloor and joist below. The key is countersinking the screw head below the wood surface and filling the hole with wood filler matched to the floor color so it’s invisible after.
Drill a pilot hole first — skipping this risks splitting the hardwood. Use a bit slightly smaller than the screw shank. Drive the screw at a slight angle toward the joist, countersinking the head about 1/8 inch below the surface. Fill the hole with color-matched wood filler, let it cure, sand flush, and touch up with finish if needed. Done carefully this repair is nearly invisible.
The Squeeeeek No More Kit
This is a commercial product designed specifically for fixing squeaky floors through finished flooring. It uses specially designed screws with a breakaway head — you drive the screw through the finished floor and into the joist, then snap off the head at the surface, leaving just a small hole that’s filled with a color-matched putty. It works extremely well on both carpet and hardwood and produces a clean result without needing to be precise with a countersink. Available at hardware stores and worth having for multi-spot repairs.
Talcum Powder or Powdered Graphite for Board-to-Board Squeaks
If the squeak is coming from hardwood boards rubbing against each other at the joints rather than from the subfloor below, lubricating the joint is the fix. Sprinkle talcum powder or powdered graphite liberally over the squeaky area and work it into the joints between boards with a soft brush or your fingers. Walk back and forth over the area to work the powder deeper into the joints. Wipe away the excess.
The lubricant between the boards eliminates the friction that causes the squeak. This fix is temporary — it needs to be reapplied every year or two as the powder works its way out — but it’s fast, clean, and requires no tools. For a hardwood floor squeak that’s clearly coming from board-to-board rubbing rather than from below, this is the right first move before attempting more invasive repairs.
Construction Adhesive Through the Subfloor
For carpet over subfloor — where the squeak is clearly subfloor movement and you can’t access from below — a construction adhesive injected into the subfloor gap from above can work. Pull back the carpet edge nearest the squeaky area, locate the gap between the subfloor panels or between the subfloor and joist, inject construction adhesive into the gap, and weight the area heavily overnight while it cures. This is more involved than other above-floor methods but it’s a permanent fix when it works.


Squeaky Stairs — A Special Case
Stair squeaks are extremely common and have their own set of causes and fixes. Most stair squeaks come from the tread — the horizontal surface you step on — rubbing against the riser below it or the stringer on the side. The wood dries and shrinks, the joint loosens, and the tread moves slightly when stepped on.
From Below the Stairs
If your stairs have an open or accessible underside, this is the easiest fix. Look at the joint where the tread meets the riser from below. Apply a bead of construction adhesive into this joint and drive a couple of finish screws up through the riser into the tread from below. This pulls the tread tight against the riser and eliminates the rubbing. Invisible from above and permanent.
From the Front of the Riser
Drive finish nails or screws at an angle through the face of the riser into the tread above, pulling the joint tight. Countersink and fill the holes. This tightens the riser-to-tread joint which is where most stair squeaks originate.
Lubricating Stair Joints
For accessible stair joints that creak, working powdered graphite or talcum powder into the joint between tread and riser lubricates the surfaces and stops the squeak immediately. Like the floor version this needs periodic reapplication but it’s the fastest fix available.


When Squeaks Indicate a Bigger Problem
Most squeaky floors are purely a nuisance — the structural integrity of the floor is fine, the connection has just loosened with normal wood movement. But occasionally a squeak indicates something worth investigating further.
If an area of floor that was previously quiet suddenly develops a significant squeak, especially if it’s accompanied by any bounciness or flex when you walk on it, this can indicate a joist that has been compromised — by moisture damage, rot, insect damage, or an overloaded span. Get under the floor if possible and look at the joist in that area. Soft wood, visible rot, or a joist that has cracked or sagged needs professional evaluation before you try to fix the squeak.
Carpenter ants and termites can damage floor joists enough to cause new squeaks in previously quiet floors. If your squeak is new and accompanied by any other signs of pest activity — sawdust-like frass near the floor, soft spots in wood, or visible insect activity — address the pest problem before the floor repair. Our article on whether termites or ants are a bigger problem for your home covers how to identify structural damage from both.
Moisture damage to subfloor from a slow plumbing leak or chronic high humidity can cause subfloor panels to swell, delaminate, and produce new squeaks along with soft spots. If you find soft or springy areas adjacent to the squeak, moisture damage to the subfloor is likely and the subfloor may need replacement in that area. Our article on repairing water damaged drywall covers the moisture damage investigation process that applies equally to subfloor situations.
Squeaky Floors in Specific Floor Types
Engineered Hardwood
Engineered hardwood is more dimensionally stable than solid hardwood and less prone to board-to-board squeaks from seasonal movement. When engineered hardwood squeaks it’s almost always a subfloor issue rather than the flooring itself — the same subfloor fixes described above apply. One additional cause specific to engineered hardwood is a floating installation where the floor isn’t fastened to the subfloor — in this case the entire floor panel system can shift slightly and boards rub at the locking joints. Ensuring the floor has appropriate expansion gaps at all walls and transitions resolves most floating-floor squeaks.
Laminate Flooring
Laminate floating floors squeak for the same reason as floating engineered hardwood — the panels shift and rub at the locking joints. Laminate is also sensitive to subfloor flatness — any high spots or low spots in the subfloor cause the laminate panels above to flex when walked on, and the flexing produces noise at the joints. For new laminate squeaks check whether the underlayment has shifted or bunched up, creating uneven support. For older laminate squeaks on an uneven subfloor, self-leveling compound applied to low spots in the subfloor before relaying the flooring is the permanent fix.
Tile Over Concrete
Tile over concrete typically doesn’t squeak — concrete doesn’t flex and tile doesn’t rub against itself under normal conditions. If you have a tile floor that squeaks or makes hollow sounds when walked on, this indicates a loose tile that has lost its bond to the substrate. The tile needs to be re-adhered or replaced. Tapping across tile with a coin or knuckle produces a hollow sound over loose tiles versus a solid sound over bonded tiles — this helps locate the problem areas.


The Long-Term Prevention Mindset
Once you’ve fixed your squeaky floors, a few things keep new squeaks from developing.
Maintaining consistent indoor humidity — between 35-50% relative humidity year-round — reduces the seasonal wood movement that causes fasteners to loosen over time. Dramatic swings between very dry winter air and humid summer air accelerate wood movement and squeak development. A humidifier in winter and air conditioning in summer keeps humidity in the range where wood is most stable.
Addressing any moisture problems under the floor proactively — basement humidity, crawl space vapor issues — keeps the subfloor and joists dimensionally stable and prevents the softening and movement that accelerates squeak development. Our article on why your house smells musty covers moisture under the floor as part of a broader moisture management approach.
When doing any renovation that involves access to floor cavities — finishing a basement, opening up a crawl space — take the opportunity to add adhesive to any subfloor-to-joist connections that show movement. Prevention done while you have access is infinitely easier than fixing squeaks through finished flooring later.


The Bottom Line
Squeaky floors are wood moving against wood or against fasteners — the result of normal drying and seasonal movement that loosens connections made when the wood contained more moisture. They’re fixable with basic tools and materials whether you have access from below or are working entirely from above.
From below: shim gaps between the subfloor and joist with adhesive-coated shims, or drive screws up through the subfloor to pull it tight against the joist. From above: drive screws through finished flooring at an angle into the joist with filled and finished holes, or lubricate board-to-board joints with talcum powder for a fast temporary fix. For stairs, construction adhesive and screws at the tread-riser joint from below is the cleanest permanent solution.
Pick the method that matches your access situation, locate the squeak precisely before you start, and the fix takes under an hour for most single-spot squeaks. That midnight hallway creak doesn’t have to be permanent.
About the Author — Dave Pritchard
Dave Pritchard spent fifteen years as a residential building inspector before transitioning to full-time writing about home repair and maintenance. He’s assessed thousands of floors across hundreds of homes and traced squeaks to their structural causes more times than he can count. He contributes regularly to DIY Home Wizard on structural repairs, plumbing, and home maintenance topics.
As an Amazon Associate we earn from qualifying purchases through some links in our articles.