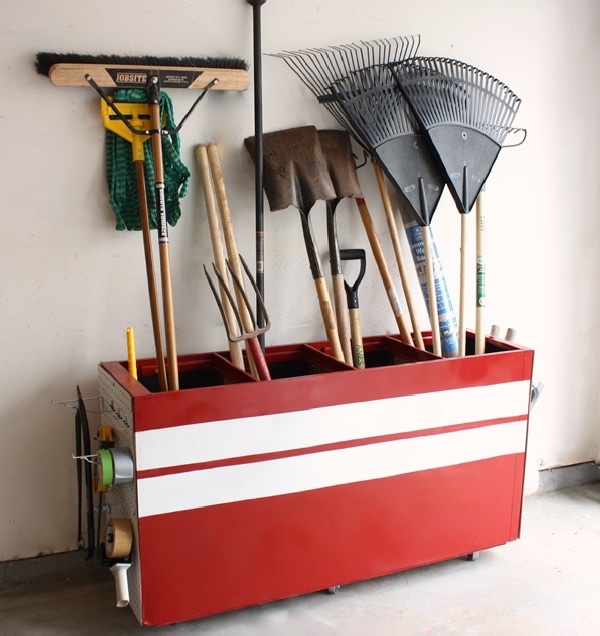
A garage free from clutter is every homeowner’s desire. And when it comes to managing lengthy tools like rakes, brooms, and shovels, having a dedicated storage space is a game-changer. This DIY tool organizer, with its trio of compartments, promises easy access and neat organization. If you’re ready to end the days of tools toppling over or leaning awkwardly against walls, read on!
Materials You’ll Need:
- Choice of plywood or metal sheets
- Appropriate screws (wood or metal depending on your material)
- Drill
- Level
- Stud finder
- Measuring tape
- Saw (if using plywood) or metal cutter (for metal sheets)
- Optional finishes: paint, rust-resistant spray, or sandpaper
Building Your Tool Organizer:
- Measurement & Design:
- Ascertain the desired size of your organizer, making sure it’s height-compatible with your tallest tool.
- Plan the width for each compartment, ensuring sufficient room for multiple tools.
- Cut & Shape:
- Shape the base according to your determined size.
- Mold the dividers to match the height of your organizer’s width to craft the compartments.
- Assemble the Organizer:
- Fasten the dividers to the base using screws. They should be evenly spread out, thus forming three distinct compartments.
- For a smoother finish on wood, make use of sandpaper to even out rough surfaces.
- Finishing Touches:
- Opt for a paint job or apply rust-resistant spray to give your organizer a refined look. This is especially handy if you’ve chosen metal as your material.
- For added stability, affix the organizer to a wall using sturdy L-brackets. This safeguards against any inadvertent toppling.
- Setting It Up:
- Position your organizer in a convenient spot within your garage.
- Begin the sorting process by slotting the handles of your tools into the designated compartments.
Expert Recommendations:
- Categorization: Think about adding labels to each compartment. This could be a life-saver, especially for tools that see frequent use.
- Protection for the Base: To protect the base from any potential damage caused by the tool ends, a layer of rubber matting can be a practical addition.
- On the Move: If you prefer a mobile solution, attach casters to your organizer’s base.

Take control of your garage space with this DIY tool organizer. By dedicating a little time to this project, you’ll reap the benefits of a well-organized workspace where each tool has its place. Say goodbye to the days of aimlessly searching for tools and embrace the organized ease this storage solution offers!
As an Amazon Associate we earn from qualifying purchases through some links in our articles.