Having a pool in your backyard is a delightful luxury, providing countless hours of relaxation and enjoyment during the warm months. However, one common challenge for pool owners is dealing with the use of extension cords to power various pool equipment. Not only can this be unsightly, but it also poses safety risks. To address these concerns and improve the overall aesthetics of your pool area, installing underground electric is an ideal solution. In this article, we will guide you through the process of installing underground electric for your pool, eliminating the need for cumbersome extension cords and ensuring a seamless power supply.
I. Why Choose Underground Electric for Your Pool?
A. Safety and Aesthetics: Eliminating Extension Cords
- Extension cords can pose tripping hazards and increase the risk of electrical accidents.
- Underground electric offers a safer and cleaner alternative, enhancing the overall appearance of your pool area.
B. Convenience and Accessibility: Seamless Power Supply
- With underground electric, you can conveniently power your pool equipment without the hassle of dealing with extension cords.
- It provides a reliable and easily accessible power source, ensuring uninterrupted enjoyment of your pool.
II. Assessing Your Pool Area
A. Understanding Power Requirements
- Determine the power needs of your pool equipment, such as pool lights, pumps, and heaters.
- This will help you calculate the appropriate electrical load for your underground wiring.
B. Mapping Out the Electrical Layout
- Sketch a plan of your pool area, identifying the locations of your pool equipment and desired electrical connections.
- Consider factors such as proximity to the main electrical panel and the most efficient wiring route.
III. Step 1: Preparing for the Installation
A. Gathering the Necessary Tools and Materials
- Ensure you have the required tools, including a trenching tool, conduit cutter, wire strippers, and electrical connectors.
- Acquire the appropriate materials, such as conduit, wires, junction boxes, and grounding equipment.
B. Checking Local Electrical Codes and Permits
- Familiarize yourself with the electrical codes and regulations specific to your area.
- Determine if any permits or inspections are required for the installation.
IV. Step 2: Planning the Wiring Route
A. Determining the Optimal Path for the Underground Wiring
- Evaluate the landscape and identify the most efficient route for your underground wiring.
- Consider factors such as avoiding obstacles, maintaining proper burial depth, and maximizing accessibility.
B. Considering Safety and Accessibility Factors
- Ensure the wiring route is away from high-traffic areas and potential damage risks.
- Plan for accessibility to junction boxes and other connection points for future maintenance or repairs.
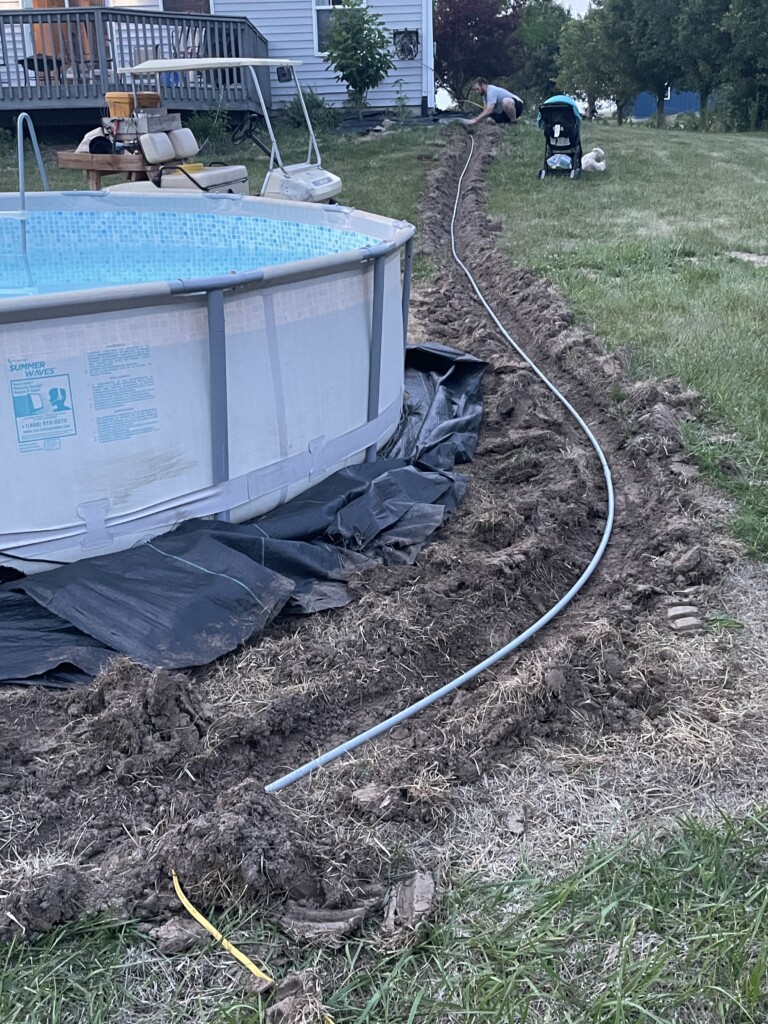
V. Step 3: Digging Trenches
A. Calculating Trench Depth and Width
- Determine the appropriate trench depth, typically around 18 to 24 inches, to ensure proper burial of the conduit.
- The width of the trench should accommodate the size of the conduit and allow for easy installation.
B. Employing Proper Digging Techniques
- Use a trenching tool or a rented trencher to dig the trenches accurately and efficiently.
- Take precautions to avoid damaging existing utility lines and ensure your safety during the excavation process.

VI. Step 4: Running Conduit and Wiring
A. Selecting Suitable Conduit Material
- Choose a durable conduit material, such as PVC or metal, that is appropriate for your specific installation requirements.
- Consider factors such as weather resistance and compatibility with the wiring.
B. Safely Installing and Securing the Wiring
- Feed the electrical wires through the conduit, ensuring they are protected and properly secured.
- Use appropriate connectors and clamps to fasten the conduit and secure the wiring at junction boxes and connection points.
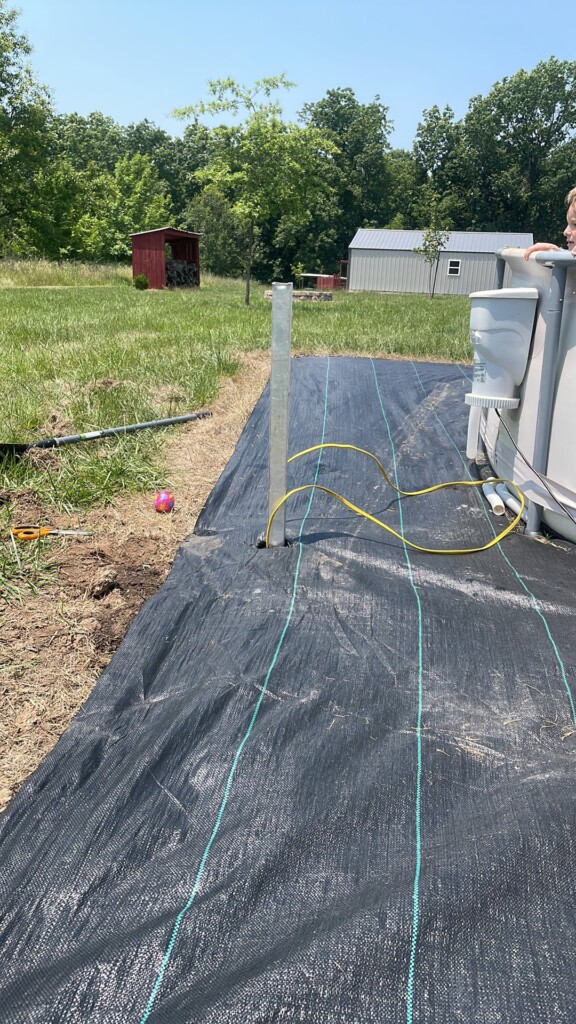
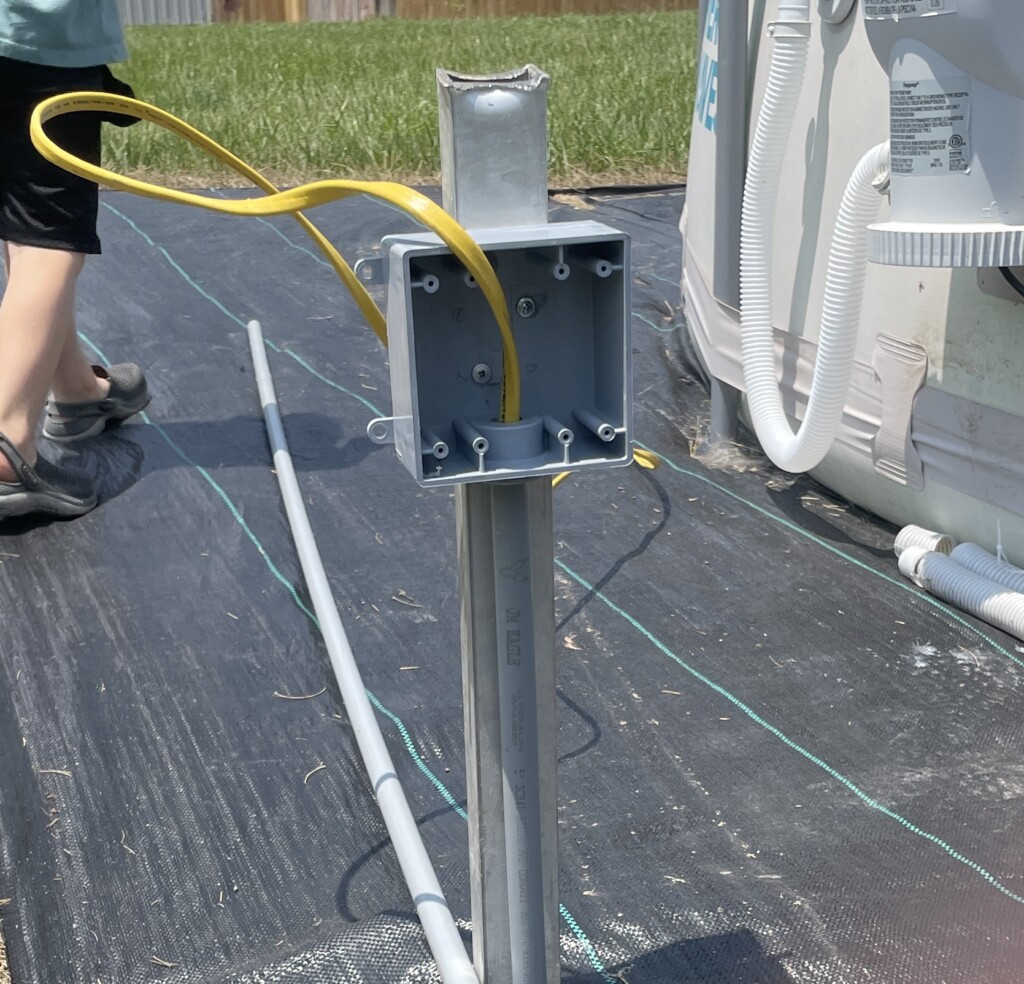
VII. Step 5: Installing Conduit and Junction Boxes
A. Connecting Conduit Pieces for a Seamless System
- Join the conduit pieces together using connectors, couplings, or solvent welding, depending on the conduit material.
- Ensure a tight and secure connection to maintain the integrity of the underground electrical system.
B. Mounting Junction Boxes for Easy Access
- Install junction boxes at key points along the wiring route, such as near pool equipment and connection points.
- Ensure the boxes are securely mounted and easily accessible for future maintenance or troubleshooting.
VIII. Step 6: Connecting Wiring to Pool Equipment
A. Understanding Electrical Connections
- Familiarize yourself with the electrical requirements and wiring configurations for your specific pool equipment.
- Refer to the manufacturer’s instructions and consult an electrician if needed.
B. Properly Wiring Pool Lights, Pumps, and Heaters
- Make the necessary electrical connections, following proper wiring techniques and adhering to electrical codes.
- Take precautions to ensure proper grounding and use appropriate wire connectors for a secure and reliable connection.
IX. Step 7: Testing and Safety Measures
A. Conducting a Thorough Electrical Inspection
- Before energizing the system, perform a comprehensive inspection of all connections and wiring.
- Check for any loose connections, exposed wires, or signs of damage that may compromise safety.
B. Ensuring Proper Grounding and Safety Protocols
- Verify that the system is properly grounded to prevent electrical hazards.
- Install appropriate grounding equipment, such as ground rods or grounding clamps, as per electrical codes.
X. Additional Tips for a Successful Installation
A. Waterproofing and Protecting Electrical Connections
- Apply waterproof sealants or use waterproof junction boxes to protect the electrical connections from moisture and weather elements.
- This ensures the longevity and reliability of the underground electrical system.
B. Seeking Professional Assistance, if Needed
- If you are uncertain about any aspect of the installation process or lack electrical expertise, consult a licensed electrician.
- They can provide guidance, ensure compliance with local electrical codes, and enhance the safety of your installation.

By installing underground electric for your pool, you can eliminate the hassle and safety risks associated with extension cords while enjoying a cleaner and more organized pool area. With careful planning, proper installation techniques, and adherence to electrical codes, you can achieve a seamless power supply for your pool equipment. Take the necessary precautions, follow the step-by-step process outlined in this article, and consider seeking professional assistance when needed. Embrace the benefits of underground electric and enhance your pool experience with convenience, safety, and aesthetic appeal.

As an Amazon Associate we earn from qualifying purchases through some links in our articles.