
The DIY Auto Fill Humidifier – A Game Changer
Nobody enjoys the daily hassle of refilling a humidifier—especially when the air gets so dry that your humidifier runs out of water in just a few hours. If you’ve ever wished your humidifier could just fill itself, you’re in the right place. I came up with a simple DIY auto fill humidifier setup, and let me tell you—it works like a charm.
This guide will show you exactly how to set up an auto-refilling humidifier so you can say goodbye to constant refills. Using a float valve (like the one in a toilet tank) and a direct water line hookup, your humidifier will automatically refill itself as the water level drops. No more checking the tank, no more late-night refills—just perfect humidity, 24/7.
But before we get into the nitty-gritty, let’s take a look at how this system actually works.


How an Auto Fill Humidifier Works
The Concept Behind It
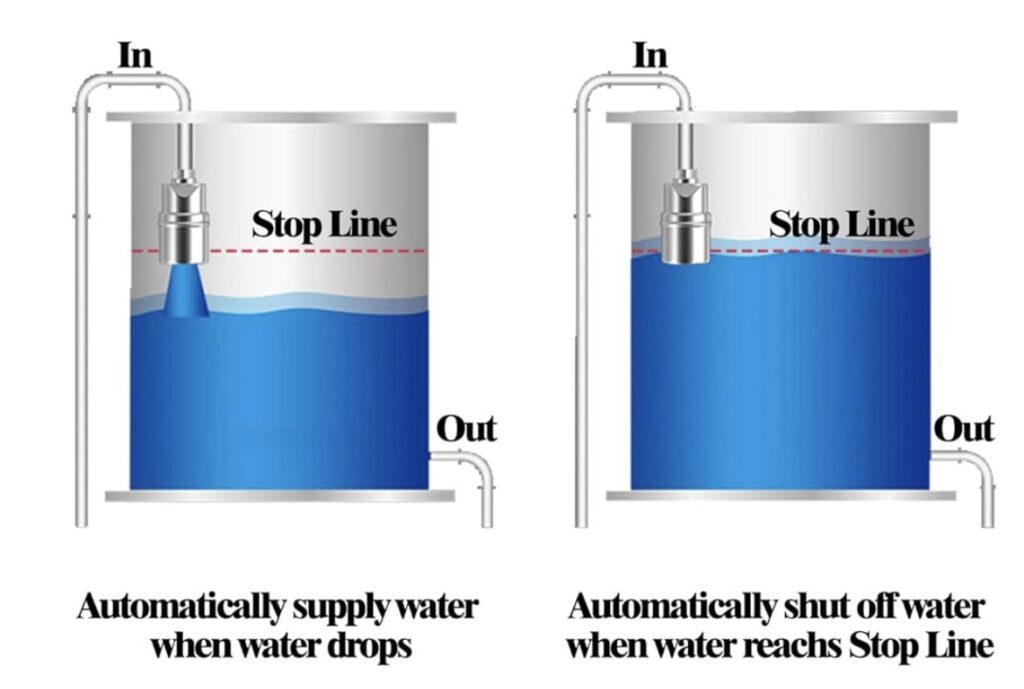
The idea behind an auto fill humidifier is simple but effective—it works just like a toilet tank! A float valve controls the water level, automatically allowing water in when it gets low and shutting it off once it reaches the set level. This means you never have to manually refill the humidifier again.
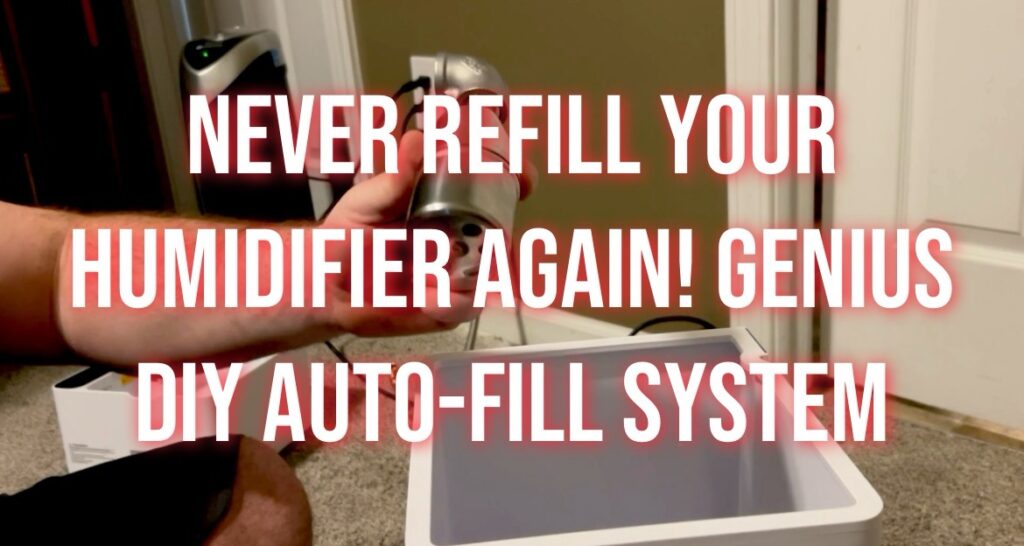
I used a T-splitter to tap into the existing water supply line under my sink. From there, I ran a 3/8-inch metal sink hosethrough the wall into the hallway where my humidifier sits. To make it look clean and adjustable, I installed a small access panel in the drywall. This lets me reach the shutoff valve and make any adjustments when needed.
Once the line reaches the humidifier, a 90-degree valve secures the float valve inside the humidifier tank. The float moves up and down as the water level changes, ensuring a steady, controlled refill process. And for extra control, I installed a small shutoff valve on the new water line—so I can turn off the supply to just the humidifier when needed.
The Benefits of an Auto Refill Humidifier
✅ No More Manual Refilling – Say goodbye to dragging a water pitcher around or spilling water everywhere. This system takes care of itself!
✅ Consistent Humidity – Because the humidifier always has water, it runs smoothly without interruptions—perfect for keeping the air comfortable.
✅ Prevents Overfilling & Leaks – The float valve stops the water at the perfect level, preventing spills and wasted water.
✅ Super Convenient for Large Rooms & Whole-House Humidifiers – If you’re using something like the 5.3Gal/20L Warm and Cool Mist Whole House Humidifier, an auto-fill system keeps it running without the hassle of constant refills.
✅ Easy to Shut Off When Not Needed – With a dedicated shutoff valve, you can quickly turn off the humidifier’s water supply without affecting the rest of the plumbing.
If you’ve ever struggled with condensation on windows due to inconsistent humidity levels, this setup can help regulate moisture better. I talk more about that in this guide on condensation issues.
Check out our full video showing us make this idea come to line!
Materials You’ll Need for Your DIY Auto Fill Humidifier
Now that you know how an auto fill humidifier works, let’s go over what you’ll need to build one. While you can get some parts online, I highly recommend visiting a local plumbing store for the fittings and hoses—they’ll help you get exactly what you need for your specific setup.
Key Components for the Auto Refill System
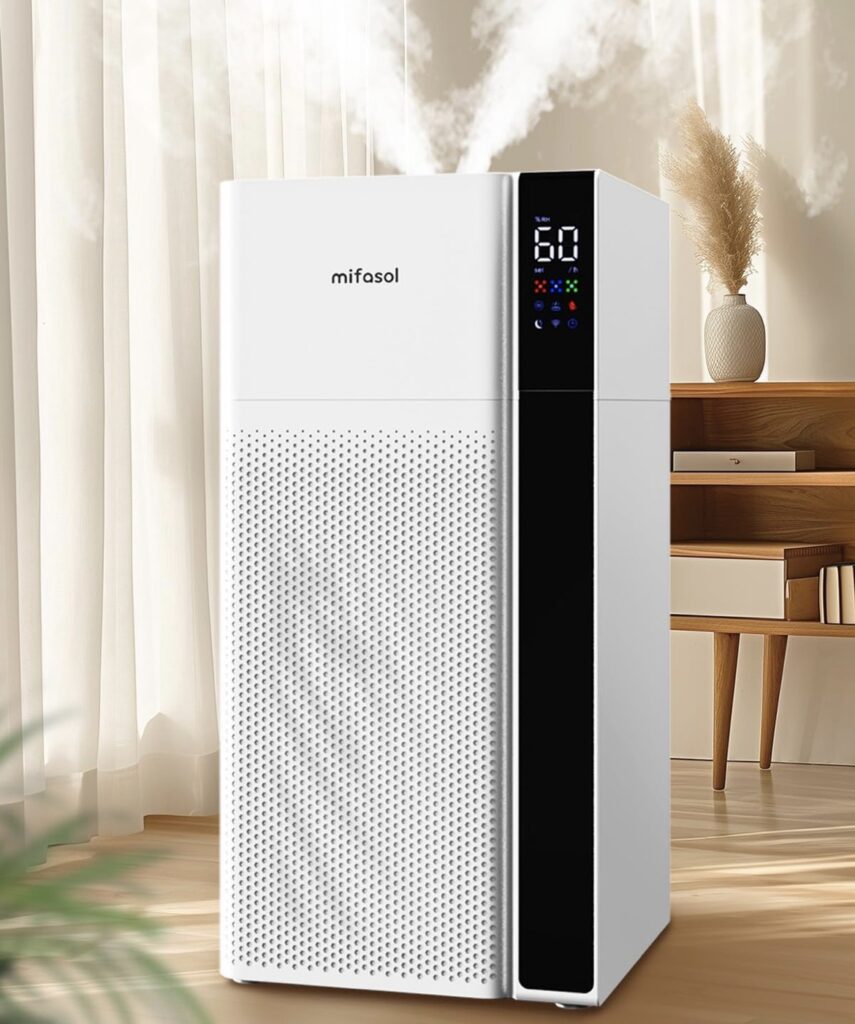
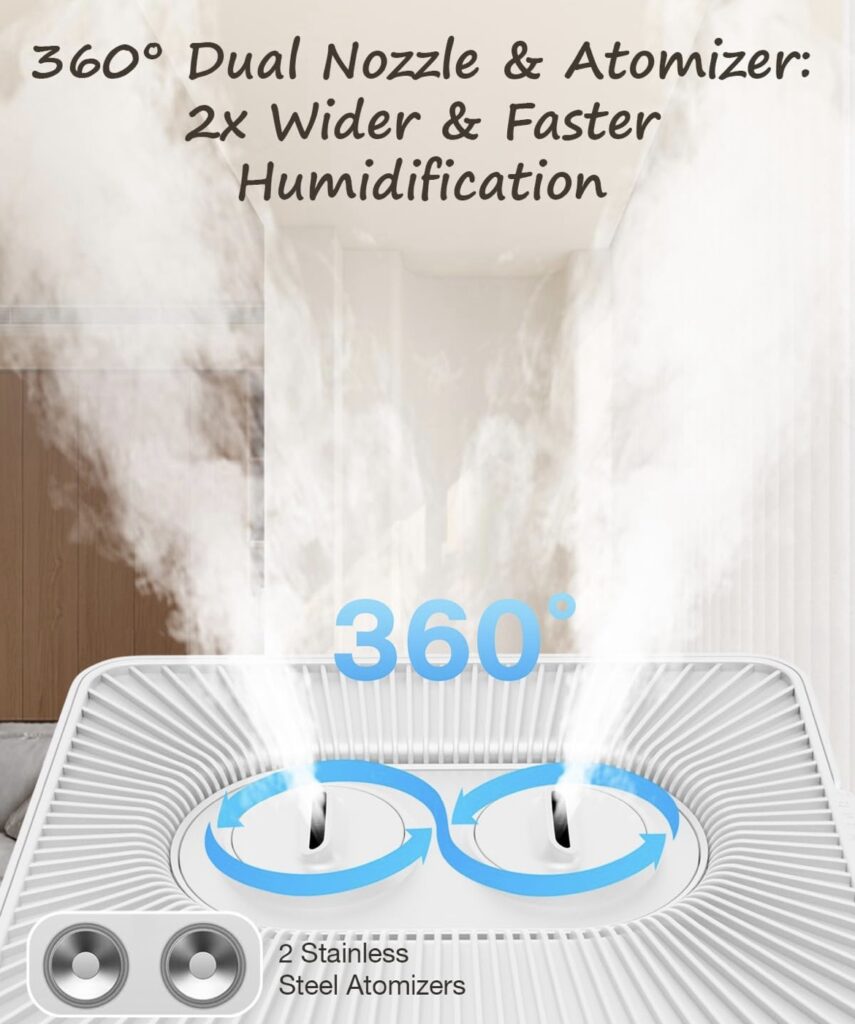
✅ A Large-Capacity Humidifier – Since the whole point is to stop manually refilling your humidifier, it helps to have a high-capacity unit. I used the 5.3Gal/20L Warm and Cool Mist Whole House Humidifier, which works great for bigger rooms.
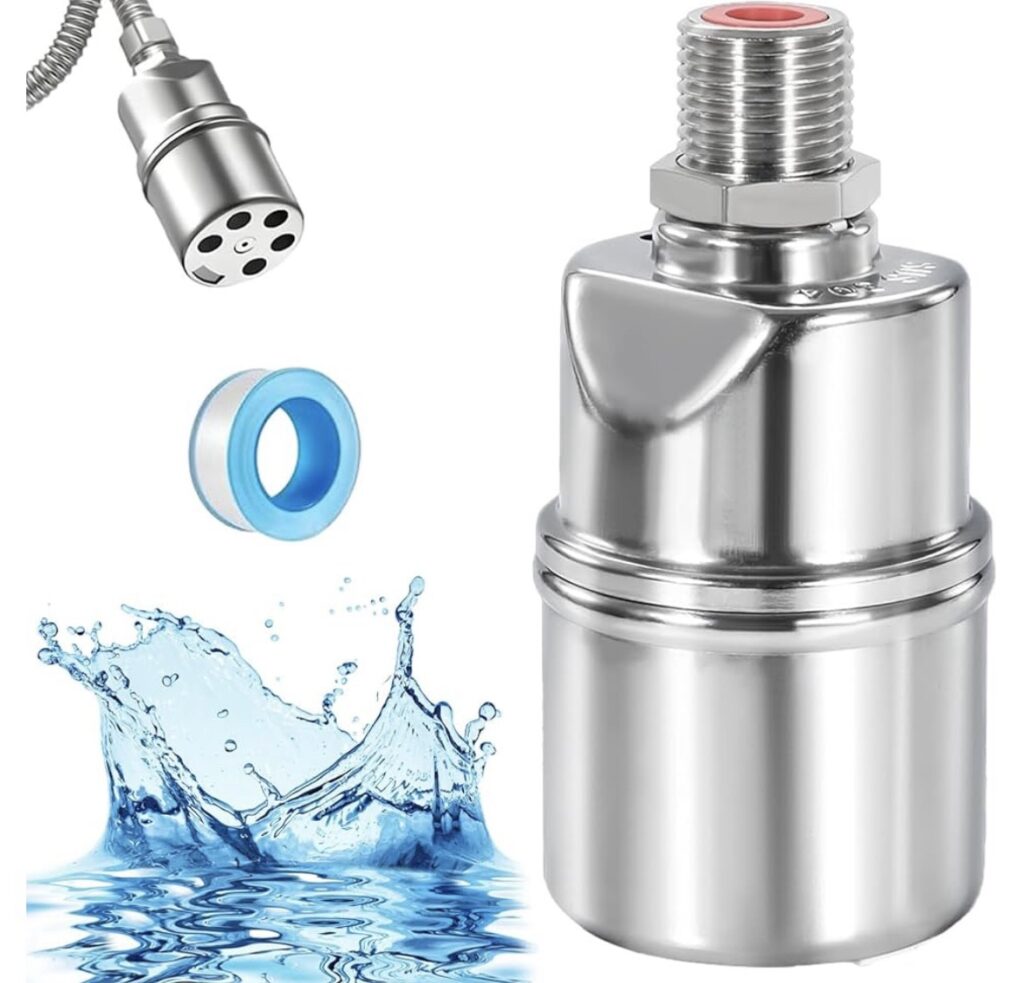
✅ A Float Valve – This is the most important part of the system. It controls the water level inside the tank, turning the water on and off as needed. I went with this 1/2″ Automatic Water Level Control Float Valve because it’s stainless steel, durable, and reliable.
✅ A T-Splitter for Your Sink’s Water Line – To hook into an existing water source, I used a T-splitter that connected to the cold-water line under my sink. This way, I could still use my sink normally while also running a line to the humidifier.
✅ 3/8” Metal Sink Hose – This is the standard type of hose used for sink hookups. I ran this hose from under the sink, through the wall, and into the hallway where my humidifier sits.
✅ A Shutoff Valve – I installed a small shutoff valve on the new water line so I could turn off the water supply to just the humidifier if needed—without affecting the sink.
✅ A 90-Degree Valve & Mounting Hardware – The float valve needs to be held in place inside the humidifier’s tank, so I used a 90-degree fitting to secure it properly.
✅ An Access Panel for the Wall (Optional, But Looks Cleaner!) – Since I ran the water line through a wall, I installed a small access panel so I could reach the shutoff valve and make adjustments later if needed. This keeps everything neat and professional-looking.
Where to Get These Materials?
I bought my humidifier and float valve on Amazon, but for the rest of the parts, I went to a local plumbing store. That was the best decision because they helped me get the right fittings and hoses to match my setup. If you’re doing a project like this, I highly recommend going in person and explaining what you’re trying to do—plumbing stores are used to helping DIYers, and they’ll make sure you get exactly what you need.
And if you’re already making plumbing upgrades, you might want to check out this guide on fixing slow-flushing toilets—because once you start improving things, it’s hard to stop!


Step-by-Step Guide to Setting Up Your Auto Fill Humidifier
Now that you have all the materials, it’s time to put everything together. Setting up your DIY auto fill humidifier isn’t too difficult, but it does require some careful plumbing work to ensure everything is leak-proof and working smoothly.
Connecting the Water Line
The first step is getting water from your sink’s plumbing to your humidifier. Since I didn’t want to cut into my main water lines, I used a T-splitter to tap into the cold-water line under my sink.
- Turn off the water supply under your sink before doing anything. You don’t want an unexpected shower while working!
- Disconnect the existing cold-water line and attach a T-splitter to create a second connection.
- Reconnect your sink hose to one side of the splitter and attach the new 3/8” metal sink hose to the other side.
- Run the new water line through the wall (I drilled a small hole and fed it through into the hallway where my humidifier sits).
- Install a small shutoff valve on this line before it reaches the humidifier. This lets you turn off the water to just the humidifier when needed without affecting the sink.
At this point, you have a dedicated water supply running to your humidifier. Next, we need to hook it up inside the humidifier tank.
Installing the Float Valve
The float valve is what makes this whole system work. It controls the water level inside the tank, just like in a toilet.
- Drill a small hole in the side of the humidifier tank—just big enough for the float valve’s threaded end to fit through.
- Insert the float valve through the hole and secure it in place with a washer and nut. Make sure it moves freely up and down.
- Attach the 90-degree valve fitting inside the tank to ensure the float stays in position and doesn’t wobble around.
- Connect the incoming water line to the float valve, ensuring a tight, leak-proof connection.
Once installed, the float valve will automatically open and close, allowing water to flow in only when needed. This means you’ll never have to worry about overfilling your humidifier again!
Ensuring a Leak-Proof Connection
Water leaks can ruin an otherwise perfect setup, so take a few extra steps to make sure everything is sealed properly:
✔️ Use plumber’s tape on all threaded connections to prevent small leaks.
✔️ Hand-tighten first, then snug with a wrench—don’t overtighten, or you might crack a fitting.
✔️ Test everything before sealing it up—turn the water on and check for drips before closing up the access panel.
Speaking of sealing things up, if you ever deal with water damage from leaks (or anything else), I wrote about how to repair water-damaged drywall. Handy to know if you ever have an oops moment!
With the float valve installed and the water line connected, it’s time to turn everything on and test the system. Let’s go over that next.


Testing Your Auto Fill Humidifier Setup
Now that everything is installed, it’s time for the moment of truth—turning on the water and seeing if your humidifier fills itself as planned!
Step 1: Slowly Turn on the Water Supply
Before going full blast, start by slowly opening the shutoff valve on your new water line. This allows the water to enter the float valve gradually, helping you spot any leaks before they become a problem.
- If no leaks appear, you’re on the right track!
- If you notice drips around fittings, tighten them slightly and apply plumber’s tape if needed.
Step 2: Watch the Float Valve in Action
As the water starts flowing, keep an eye on the float valve inside the humidifier tank. It should:
✔️ Lower and allow water in when the tank is empty
✔️ Rise and shut off the water flow when the tank reaches the correct level
If everything is working as expected, you officially have a self-filling humidifier! 🎉
Step 3: Adjust If Necessary
Depending on your setup, you might need to make a few small tweaks:
- If the float valve shuts off too early, adjust its position slightly lower in the tank.
- If the humidifier overfills, move the float valve higher to reduce the fill level.
- If you ever need to turn off the system, just use the small shutoff valve you installed earlier.
Step 4: Let It Run & Monitor for a Day
Before declaring victory, let the system run for a full day to ensure it’s operating smoothly. Check for:
- Any small leaks or drips
- Proper humidifier operation
- The float valve responding correctly to water levels
What If Something Goes Wrong?
If your humidifier isn’t filling correctly or there’s a plumbing issue, don’t panic. Most problems are minor and can be fixed with a quick adjustment.
💧 Water not filling the tank? Double-check the shutoff valve and ensure the float valve isn’t stuck in the closed position.
💧 Slow filling? If your water pressure is low, try using a larger-diameter hose.
💧 Leaks around fittings? A little extra plumber’s tape or tightening the connections should solve it.
For other common home plumbing fixes, check out this guide on unclogging a drain—because once you start DIYing, you’ll probably want to fix everything!
Now that your auto fill humidifier is up and running, let’s talk about common questions people have about DIY setups like this. 🚀
Common Questions About DIY Auto Fill Humidifiers
If you’ve made it this far, congrats—you now have a fully functional auto fill humidifier! But before you kick back and enjoy your perfectly humidified air, let’s go over some common questions that might pop up.
Can Any Humidifier Be Converted to Auto Fill?
Not every humidifier is a good candidate for an auto-fill system. The best ones have:
✔️ A removable water tank or an easy-to-access filling area
✔️ Enough space inside the tank to mount a float valve
✔️ Durability to handle continuous water flow
I used the 5.3Gal/20L Warm and Cool Mist Whole House Humidifier because it has a large tank and works great for this setup.
Is It Safe to Connect a Humidifier to a Water Line?
Yes—if done correctly. The key to safety is using a float valve to control the water flow and installing a shutoff valve for emergencies.
- Without a float valve, the humidifier could overfill and cause water damage.
- A shutoff valve lets you quickly cut off water to the humidifier without affecting your sink or other plumbing.
And if you’re running your water line through a wall, you may want to check out this guide on mounting an outdoor spigot—some of the same principles apply when securing pipes and fittings inside walls.
What If I Need to Turn Off the Water Supply?
This is where that small shutoff valve on your new water line comes in handy! If you ever need to:
🚫 Stop using the humidifier for a season
🚫 Clean or move the humidifier
🚫 Adjust the float valve
You can simply turn off the shutoff valve without messing with your sink or main water supply.
How Do I Prevent Mold & Bacteria Growth in the Humidifier?
Since your humidifier will always have water now, keeping it clean is essential. Here are a few tips:
🧼 Use filtered water if possible—it reduces mineral buildup.
🧼 Clean the tank regularly with vinegar or hydrogen peroxide to kill bacteria.
🧼 Wipe down the float valve occasionally to prevent dust and mold.
For more home maintenance tips, check out this list of must-know tasks for first-time homeowners—because keeping your home in top shape is all about staying ahead of problems!
Now that we’ve answered the big questions, let’s talk about how to maintain your auto fill humidifier long-term so it keeps running smoothly. 🚀
Maintaining Your Auto Fill Humidifier
Your DIY auto fill humidifier is up and running, but like any system, it needs a little maintenance to keep it working efficiently. The good news? It’s way less work than manually refilling it every day!
Cleaning and Preventing Mold Growth
Since your humidifier now has a constant water supply, it’s important to prevent mold, bacteria, and mineral buildup. Here’s what I do to keep mine clean:
🧼 Wipe down the tank weekly – Even though fresh water is always flowing in, some areas can still collect dust and bacteria. A quick wipe with a vinegar solution does the trick.
🧼 Deep clean every 2-4 weeks – Drain any leftover water, scrub the inside of the tank, and rinse out the float valve to keep it in top shape.
🧼 Use filtered water if possible – Hard water can cause mineral buildup over time. If your area has hard water, consider using a simple inline water filter to help.
Speaking of home maintenance, if you’re ever dealing with water damage from leaks, knowing how to repair water-damaged drywall is a lifesaver. Better safe than sorry!
Checking for Leaks and Adjustments
Your float valve and water line should last a long time, but it’s a good idea to check them once in a while:
✔️ Look for drips or slow leaks around the float valve and hose connections. If anything seems off, tighten the fittings or add plumber’s tape.
✔️ Make sure the float valve moves freely – If it gets stuck, the water won’t shut off properly. A little cleaning or repositioning can fix it.
✔️ Test the shutoff valve occasionally to make sure it turns easily when you need it.
If you ever notice excess moisture or condensation around your humidifier, check out this guide on what causes condensation on windows—humidity balance is key to avoiding mold and damage in your home.
With just a little upkeep, your auto filling humidifier will keep running effortlessly, making your home’s air more comfortable year-round.

Final Thoughts For This Project – A Humidifier That Takes Care of Itself
Setting up an auto fill humidifier is one of those DIY projects that just makes life easier. No more daily refills, no more running out of water in the middle of the night—just perfect humidity with zero effort.
With the right humidifier (this one works great!), a solid float valve (this one does the job), and a little DIY effort, you’ve now got a hands-free humidifier system that will save you time and hassle.
And if you love smart home DIY projects, make sure to check out this guide on first-time pool ownership—because once you start automating things, you’ll want to upgrade everything!
Now, sit back, relax, and enjoy never refilling your humidifier manually again. 🚀

As an Amazon Associate we earn from qualifying purchases through some links in our articles.